Showing posts with label X-Wing. Show all posts

Monday, 16 December 2013

Week 12. Editing, reflection and final additions

I am getting close to being happy with the animation now, but i still feel i could do with a bit more action and urgency towards the end of the scene when all the ships meet. I am going to add some lasers to one of the X-Wings for the scene when it is chasing the Tie-fighter.

NOTE: In hindsight now i wish i had made all the X-Wings in the scene instances and not copies, as then these laser gun modifications i made would exist on all X-Wings. As now i am running low on time and cant modify each X-Wing individually. But still the X-Wing will only be shooting at the Tie-Fighter anyway. as they are capturing the shuttle. 


Firstly i had to create the lasers themselves. This felt fairly straight forward now, i simply used a capsule and added a glow effect in the render effects. I played with the different settings until i found a reasonable representation that i was happy with.  

Laser with glow render effects 

I then needed a method of firing the lasers. I could just animate them using key frames but i found a better way might be to use splines and path constraint like how the ships move. I can then line up and link the splines perfectly at the gun barrels which is much more accurate representation. I then used the splines from the gun barrels as the path for the laser capsules, they will then always shoot forward relative to the ship orientation.  

Lining up and linking the lasers


I made the animation faster by moving the key frames closer together so they will shoot a lot quicker than the ship will be travelling. By utilizing the same techniques i used on the flame output, i looped the animation in the curve editor so the lasers will constantly fire. This also eliminates the need for me to destroy the lasers as they will just stop moving and repeat when the path ends.  

I also took this time to add a glow render effect to the X-Wing flames output. I just used a different material ID to the lasers, this will now effect all the flames on all the X-Wings in the scene as they all use the same material.  

Practice animation with one working laser

Lasers on all guns and added glow to engine flames 


Now when i shoot the scene with the X-Wing chasing the Tie-Fighter it will shoots lasers toward it. This will bring the scene to more of a climax and give the scene more of a hostile nature and just generally more action. 

New Scene with lasers shooting at Tie-Fighter 

I had to re-shoot the X-Wings scenes so they include the glow on the new engine flames.
I wanted to add a quick shot of when all the ships come together too as they all seem to be really far apart then suddenly all together. This will link the first few scenes and the chase sequence together more organically. And i don't have many shots that incorporate all the ships.

All the ships heading into the chase

also i changed the camera angle and position during the shuttle escape scene so you can more of the shuttle but also by moving the X-Wing path slightly we see more of what is going on in the background.

New shuttle escape scene

Final animation edit


I am much happier with the final animation now. There is more action, more build up, and all the scenes link together and flow a lot better. I still think it could be improved though. I shot a lot of scenes separately, ie in different scene files, because i was happy with some but not others, and didn't want (nor have the time ) to re shoot the first ones i was happy with. This lead to the lines i used for movement not being one continuous line, but several broken and smaller ones. Having lots of small scenes and then having to match them up in the editing software proved quite tricky, and i felt a continuous scene would also have a better flow to it. My animation can look slightly broken up at times. Just because this was my first animation and my organisation and ability to plan ahead can improve. I would have liked to have time to add lasers to all the X-Wings too. I did feel quite restricted by the 30 second time limit too.

I am going to continue working with these models and im eager to improve upon my work this far. I want to make a new longer scene and incorporate the improvements i have discussed. It might be nice to introduce a planet surface too so not all of the scene is in space, the chase could maybe accumulate on the surface of the planet. I would also like to inculde some more effcets like sparks flying when the ships get hit and maybe some explosions.

Keep posted for further improvements and updates......................

Wednesday, 20 November 2013

Week 8, Texturing X-Wing

Once i was comfortable with the different techniques regarding creating and applying material to objects i started with my first model the X-Wing.

Learning form previous exercises i decided that to get the most control and the highest level of detail to do my models justice, that using the unwrap modifier would be the best way forward. I have also learned that as my model is highly complex and i made its mainly one large mesh apart form small details, I would break down the model into smaller easily distinguishable parts. Then when i apply the modifier the polygons will be fewer and much easier to paint on. This will also help me get nice clean lines on different parts of the ship.

The first step was to break the model down as if it has literally been assembled in a physical sense. Again this greatly improves the precision i will be able to get when applying the materials.

I identified the parts of the ship that would have different colors and textures and separated them individually.

For example the roll cage of the cockpit is a different color to the main fuselage and a different material (ie, metal and glass) to the screen, so i detached this from the main mesh.

Detaching cockpit roll cage 

Painting Rollcage map in GIMP


Detached back of Fuselage 


Sometimes even when the materials are the same like on the front of the fuselage or parts of the wings, as it has different colored panels, i decided to remove the panels individually in some cases this gave me cleaner lines and textures on the objects.

Main panels and red side panels being detached individually 


Red wing panels being textured separately


When i had rendered the templates i could take them in to Gimp and start building up paint layers and applying effects to the materials. I used a noise map effect to give the metal textures an authentic brushed metal look, and used different style and sized brushed to create a weathered effect on parts of the fuselage. When you paint these templates in Gimp it gives you a lot of freedom to create individual and realistic looking textures. And because they are all unwrapped using the UVW modifier when you apply them on them model they fit perfectly and look quite realistic. 

Fuselage map and material before application 
     

X-Wing with front of fuselage and cockpit materials applied 

I could also add more effects in the material editor in 3Ds Max to get a more accurate representation of the materials. For example changing the specular and gloss levels on the material to give the metal a shiny and reflective appearance. Also with the glass i changed reduced the opacity slightly and increased the reflection parameter to make the glass look more realistic. If i had time with the models i could of introduced some geometry inside the cockpit and then i could have it so you could see through the glass completely and into the pilots bay.   

Continuing the method of detaching and unwrapping individual parts of the ship, although very time consuming starts to give a realistic looking ship. 

Engines Textured 

Fuselage fully textured 


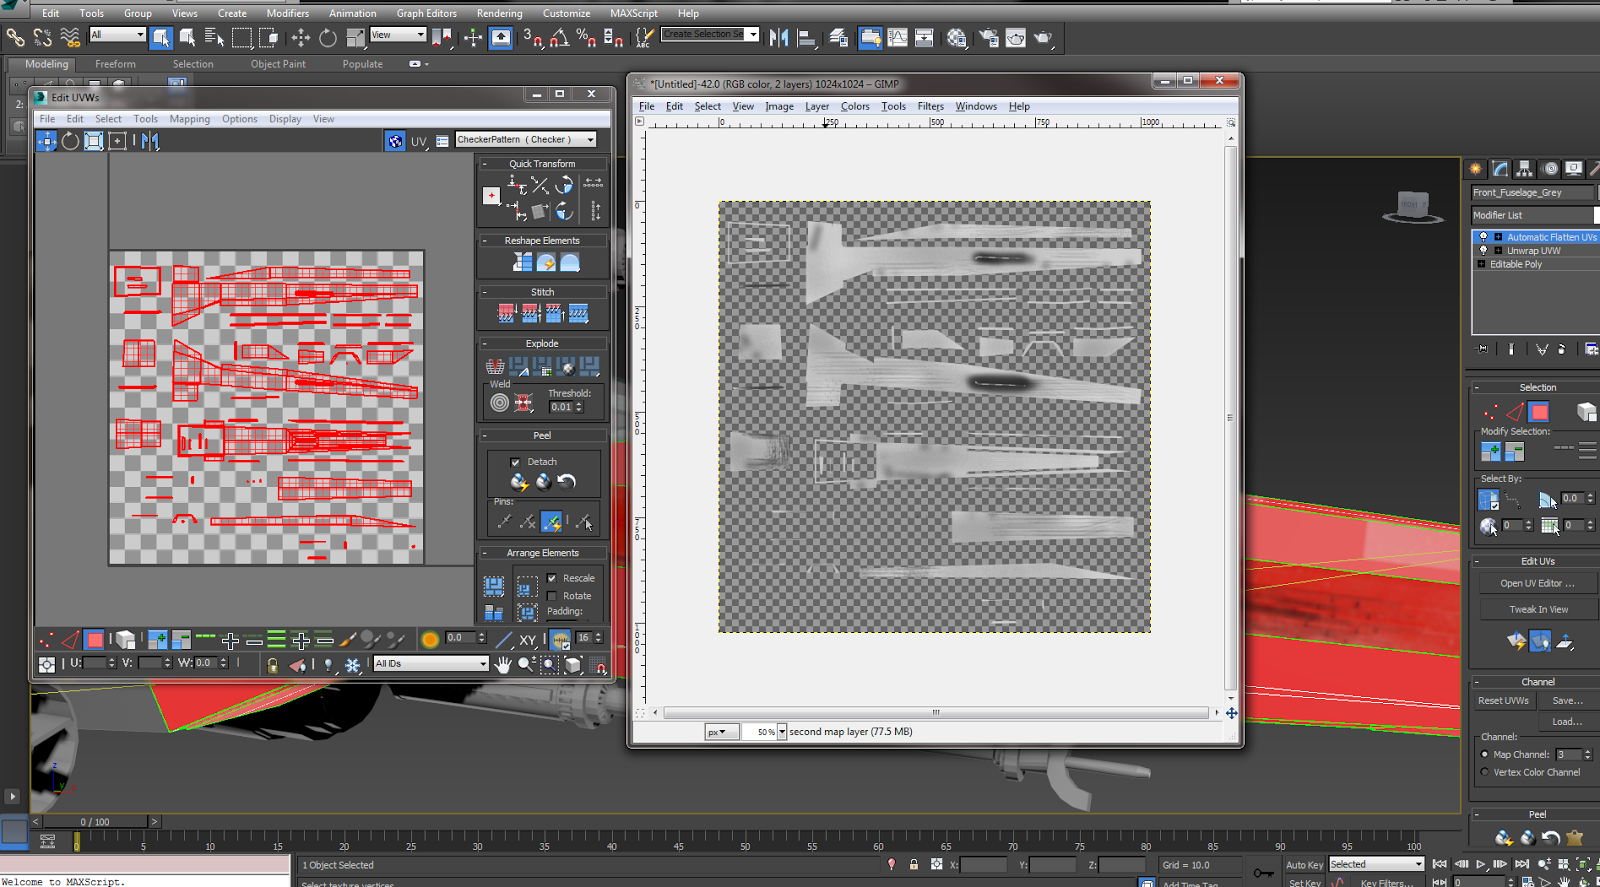
There are times when the UVW Unwrap modifier has its downfalls though. For small and high poly objects the maps sometimes become highly complicated and impossible to distinguish and work with.

Unwrapped polygons 
  
In this example the polygons are for small wires and details on the ship and due to their size a UVW unwrap is not only overly complicated but unnecessary. I can just apply a basic material to these smaller less conspicuous objects and still get a realistic overall effect by using reflective maps and bump maps.

When the entire ship was textured to my satisfaction i could start to re-attach parts of the ship back together. In some cases i decided not to re-attach and just group objects, as the model was originally mainly one whole mesh, which i now know is not always best practice. Especially when it comes to the animation, when i might want to animate individual parts of the ship like the wings folding out for example.  

Rendered Views of fully textured X-Wing


I am pleased with the final model now its textured, the materials look realistic and reflect accurately the original source images and models i have been working with. The detail i was able to achieve by unwrapping each part of the ship and texturing individually is definitely something i will use again in my other models. Although i might experiment more with the different map channels that are available within the material editor. Overall though the first model was a success. 


Saturday, 16 November 2013

Week 7. Materials and Texturing

When all the  models where finished to a standard i was happy with i had to move onto the making and applying materials to the models.

Before i started trying to texture the models i tried out the various techniques of applying and creating materials that 3ds max has to offer.

The most basic way of applying a material is to just drag it onto the desired object. This gives you no control on how the material is displayed on the object though. While this will work for basic materials that have no pattern or particular detail, if any kind of precision is required we would be better off looking to add a UVW map modifier.

The UVW map modifier allows you to chose how you would like the material to be displayed on the object, for example as a cylinder, sphere or box.


  Planar and Box Mapping using UVW map modifier  


This gives you more control on how you want the material displayed but it still limited. The objects still have to conform with one of the mapping options available, which are still pretty basic. My ships are far more complex and mainly consist of irregular shapes and will require unique maps for each part the model.

To get the most amount of control over the maps and how they are displayed we will use the UVW unwrap modifier. This allows you unwrap the desired polygons in different ways and create a flat or box map of the object. Having all the polygons laid out flat separately allows for a more accurate application of materials. If the selected object is complex it can however become difficult to establish which polygons are which. This can partly be resolved by stitching polygons back together, which 3ds max allows you to do. This helps to reestablish where each polygon is in relation to the entire object. Which is necessary if you are going to create a pattern of some kind or require a seamless material.

Stitching a box back together at the edges 


Flatten map option of Unwrap UVW modifier, with seams identified

If you desire you can also choose which edges will be the seams where the object will unwrap to and get a flat easily distinguishable map.

Along with the flatten map options you can also use box mapping. Box mapping is slightly different as keeps the object in fewer pieces. This option can work better for high poly objects like spheres, when you need to wrap a material or pattern round a smooth surface and have no seams.

Sphere Box map UVW template 

Flatten Map UVW template of same sphere

While not a huge difference w can clearly see that box map is in fewer pieces and makes texturing the template slightly easier.

When we have a UVW map and template we are satisfied with we can take the template into some image manipulation software such as Photoshop or Gimp and paint directly onto it. For future reference i will be using gimp for all my texturing.

3Ds Max has in itself vast resources for materials creation, for this project though i will be using the simplified version of the material editor. We can still produce some interesting  materials and effects though with this compact version.  

Combining different procedural maps we can create a good looking sky and clouds material which can be seen form the ground or above depending on your preference.

Creating a sky clouds material using procedural maps 

Rendered view of completed material 


Thursday, 31 October 2013

Star Wars Model, X-Wing.

Learning from previous endeavors it was mush easier to set up the virtual studio for the X-Wing. It was also nice to have source images with a top down view and a back view also, this will undoubtedly give me greater accuracy when shaping the model.
X-Wing Virtual Studio

Having four sided blueprints helped with the base shaping of the fuselage. By starting with one basic shape and extruding it a small amount to each part where the fuselage grows or shrinks i could keep the model as efficient as possible. 
Early stage fuselage 

I had to create some new edges and polygons to be able to manipulate the cockpit correctly.

Cockpit beveling 

The nose of the fuselage needed more polygons than the main hub as more of a gradual reduction is size. While adding a few more polygons the model up to now is as efficient as possible so i didn't think this was  an issue and i wanted the model to be accurate.  

Sculpting nose of fuselage 

Views of finished base fuselage 


It wasn't until i was happy with the main fuselage and started on the wings that i needed a symmetry modifier. The wings in this case are extruded form the main fuselage and not separate objects, i felt this was gave the most accurate representation. I have the ability to detach them manually at a later date if i require it, for unwrapping when i add materials for example.

The fuselage we see here is actually my second attempt. The base shape for the first model was rotated before i started the extrusion of the fuselage which meant when i tried to apply a symmetry modifier on a desired axis the center of the object was not the center of my model. I wasn't thinking ahead this time, but i quickly learned form my mistake and haven't made another similar one since.

Extrusion of the wings


Extruding parts of the wing to form engine mounts


The wing guns were made as separate objects then attached to the wing. Due to the symmetry modifier this would mirror there placement on both sides of the ship. 


Guns attached and mirrored on both sides of the ship 


I hid the main fuselage when starting on the engines to enable me a better view of the blueprints. The engines had quite a few polys because i wanted to achieve a high level of detail and match the source images best i could.   
Intake part of engine

Output part of engine 

When i tried placing the engine on the engine bays of the wing some of the bay was visible and protruding in front of the engine. I cloned the engine and then could use it as a cutter and use a Boolean operation to provide a perfect fit for my engine to be mounted. Again i attached the engines once i was happy with the placement and orientation, providing perfect symmetry and reducing the workload.  

Using Boolean to cut out the engine bay holder

Engines and guns placed on one side of the ship

Guns and engines mirrored of both sides of the ship 


The detail at the rear of the ship are all separate objects grouped together appropriately. 

Adding back detail 


For some of the top fuselage detail i just used a line shape and the auto grid option to draw on a pattern which i could then extrude and apply a shell modifier to. This reduces the need for unnecessary polygons.
  
Adding top fuselage detail 

I'm very pleased with the finished model. It reflects both the blueprints and the other source images with great accuracy. I was to do this model again the only i might change do is make it up of more separate objects and not use one large complex one. When i need to unwrap and texture the model differentiating between all the polygons could prove  challenge. Apart form that the efficiency, accuracy and detail are to a standard i didn't believe i was going to be able to achieve heading into the process.    

Complete X-Wing


Stylized views of finished X-Wing