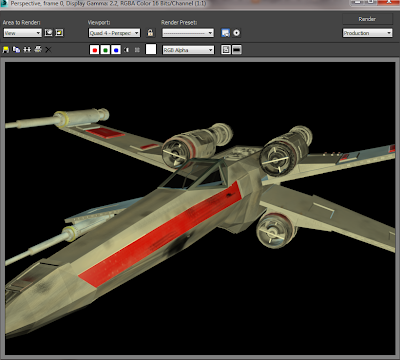
Learning form previous exercises i decided that to get the most control and the highest level of detail to do my models justice, that using the unwrap modifier would be the best way forward. I have also learned that as my model is highly complex and i made its mainly one large mesh apart form small details, I would break down the model into smaller easily distinguishable parts. Then when i apply the modifier the polygons will be fewer and much easier to paint on. This will also help me get nice clean lines on different parts of the ship.
The first step was to break the model down as if it has literally been assembled in a physical sense. Again this greatly improves the precision i will be able to get when applying the materials.
I identified the parts of the ship that would have different colors and textures and separated them individually.
For example the roll cage of the cockpit is a different color to the main fuselage and a different material (ie, metal and glass) to the screen, so i detached this from the main mesh.
Detaching cockpit roll cage
Painting Rollcage map in GIMP
Detached back of Fuselage
Sometimes even when the materials are the same like on the front of the fuselage or parts of the wings, as it has different colored panels, i decided to remove the panels individually in some cases this gave me cleaner lines and textures on the objects.
Main panels and red side panels being detached individually
Red wing panels being textured separately
When i had rendered the templates i could take them in to Gimp and start building up paint layers and applying effects to the materials. I used a noise map effect to give the metal textures an authentic brushed metal look, and used different style and sized brushed to create a weathered effect on parts of the fuselage. When you paint these templates in Gimp it gives you a lot of freedom to create individual and realistic looking textures. And because they are all unwrapped using the UVW modifier when you apply them on them model they fit perfectly and look quite realistic.
Fuselage map and material before application
X-Wing with front of fuselage and cockpit materials applied
I could also add more effects in the material editor in 3Ds Max to get a more accurate representation of the materials. For example changing the specular and gloss levels on the material to give the metal a shiny and reflective appearance. Also with the glass i changed reduced the opacity slightly and increased the reflection parameter to make the glass look more realistic. If i had time with the models i could of introduced some geometry inside the cockpit and then i could have it so you could see through the glass completely and into the pilots bay.
Continuing the method of detaching and unwrapping individual parts of the ship, although very time consuming starts to give a realistic looking ship.
Engines Textured
Fuselage fully textured
There are times when the UVW Unwrap modifier has its downfalls though. For small and high poly objects the maps sometimes become highly complicated and impossible to distinguish and work with.
Unwrapped polygons
In this example the polygons are for small wires and details on the ship and due to their size a UVW unwrap is not only overly complicated but unnecessary. I can just apply a basic material to these smaller less conspicuous objects and still get a realistic overall effect by using reflective maps and bump maps.
When the entire ship was textured to my satisfaction i could start to re-attach parts of the ship back together. In some cases i decided not to re-attach and just group objects, as the model was originally mainly one whole mesh, which i now know is not always best practice. Especially when it comes to the animation, when i might want to animate individual parts of the ship like the wings folding out for example.
Rendered Views of fully textured X-Wing
I am pleased with the final model now its textured, the materials look realistic and reflect accurately the original source images and models i have been working with. The detail i was able to achieve by unwrapping each part of the ship and texturing individually is definitely something i will use again in my other models. Although i might experiment more with the different map channels that are available within the material editor. Overall though the first model was a success.


No comments:
Post a Comment