Alignment Exercise


Castle exercise
Using only the align tool i was to arrange a group of four shapes in the following pattern.
It was not as easy as it might seem. You can choose which part (ie, center, pivot point, maximum) of the target object and what part of the current object you want to align, along with what axis (x,y,z) you which to align it to. It was not always possible to align the objects in one operation. They would have to be aligned in all axis and centered, so the axis match up and then align the desired points. I can see how this might be useful for example placing parts of wing detail onto an aircraft, so they align and match properly and leave no space between objects, giving the overall model a more realistic and accurate finish.
My alignment exercise complete
Castle exercise
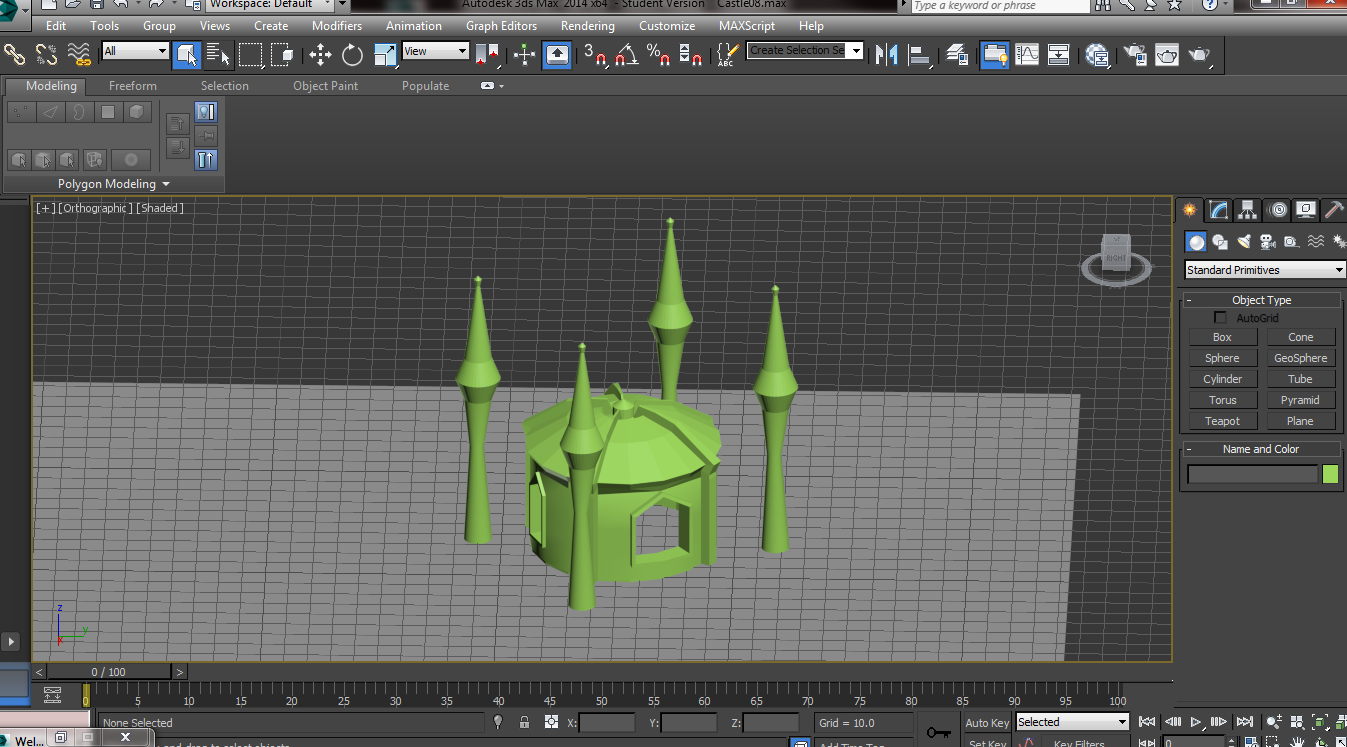
Building on the techniques discussed in week one, my next task was to model a castle complete with forbidding crenelations, towers and walls.

Converting a box primitive to an editable poly, and making use of the modifiers the castle gate house starts to take shape.

Selecting and extruding all the crenelations at once ensures uniformity around the gate house walls. Making use of the edit > swift loop function, allowed me to easily create and add more edges around the building allowing for much more detail and variation in the brickwork. A similar effect can be gained by selected and connecting edges, using swift loop instead of this gives me more freedom as the new edge is not dependent on any other already present edges.

Complete Gatehouse
The walls were constructed using the same methods as the gatehouse and then cloned so they can now just be placed around the castle perimeter ( An instance NOT copy was cloned so any changes to the original wall segment will effect the other segments in the scene).


Castle tower with small spire
Using a cylinder as a 'cutter' and using the Boolean operation a circular window can be cut out of the tower surface. Without use of this operation trying to create a circular or irregular shape within another surface just using edges and vertices, proves highly problematic and time consuming.

Again using a Boolean operation, an entrance in one of the castle walls was cut out. This time a cylinder and a box were used and two Boolean operations were needed. I noticed as the cutter objects ( Box and cylinder ) did not completely match the depth of the wall, the interior surface of the wall was compromised. Leaving open faces and irregular polygons where the cutter objects had been.


Grouped objects as a Sept
After modelling one tower which i then cloned, and a main Sept, once i was happy with the tower placement i grouped the objects together. This has the benefit of allowing me to maneuver the entire 'Great Sept' (Name of the group which includes four towers and the main building) without losing the original alignment.
Castle Entrance
Again using a Boolean operation, an entrance in one of the castle walls was cut out. This time a cylinder and a box were used and two Boolean operations were needed. I noticed as the cutter objects ( Box and cylinder ) did not completely match the depth of the wall, the interior surface of the wall was compromised. Leaving open faces and irregular polygons where the cutter objects had been.
Second entrance with baked surfaces
I used the Boolean operation again to create another entrance in the Gatehouse. This time the cutter objects depth was larger than the target objects' (Gatehouse) depth and when the operation was complete the geometry of the cutter objects was baked onto the surface of the gatehouse. This gives the model more regular polygons and permits further work if needed to the newly created surfaces.
Views of finished Castle
Finished might not be the word as there is so much more you could do with it, however i feel this exercise has come to an end and its time to move on. I learned some valuable techniques and methods i will be using moving forward.


